Search This Blog

Sunday, June 2, 2013

Potting up baby agave from the lettuce raft


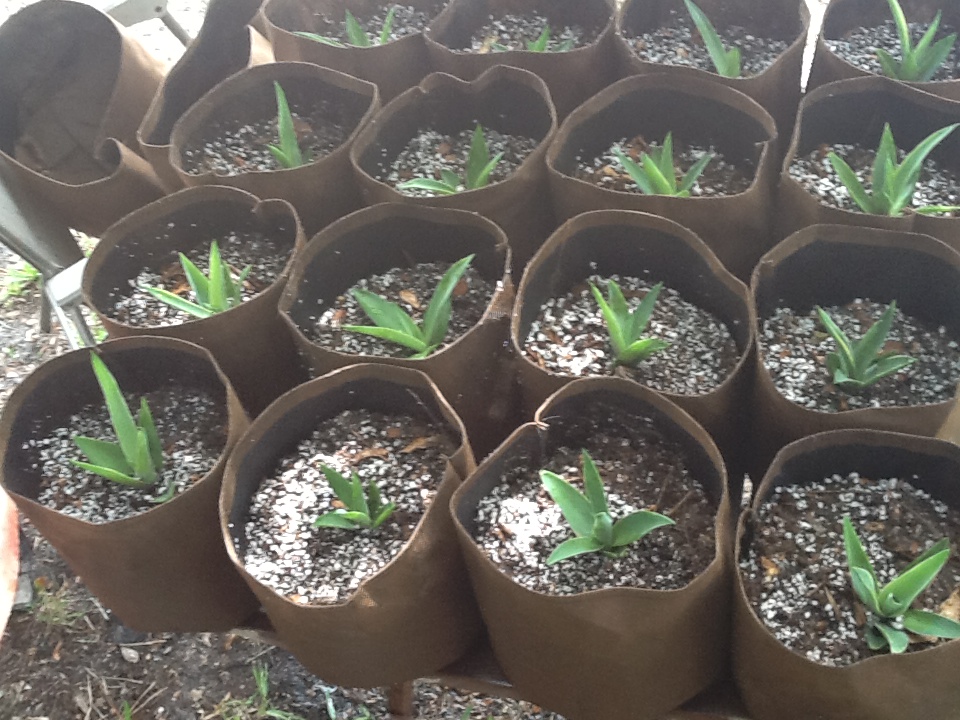
My century plant went to seed earlier this season and when the pups started forming on the seed stalk it happened to coincide with the lettuce raft coming online for the first time.  Since I had no starters plants yet I just put the pups in the net pots as they got to about an inch in size. It was amazing to see them go from one inch to six over the coarse of three weeks. With roots hanging down about ten inches I figured it was time to move them out into pots.

The first batch of agave pups came out of the lettuce raft yesterday and I was able to pot them up with a soilless potting mix (perlite, vermiculite, peat moss, sand) and some of my new air permeable soft pots that I made out of some left over ground cover fabric. The fabric was cut 8"x24" then sewn together into a pot shape with a 8" bottom. They have the benefit of not making the plant get root bound. The roots grow out to the edge of the pot, then instead of running around the edge they will branch out fine root threads. Something to do with the air permeability of the fabric. They cost about 3 or 4 cents apiece for the material and took me about 4 minutes each to sew on a used basic machine. So a pretty cheap way to pot up 400 plants.  Mat


Monday, May 13, 2013

Chicken Fodder Frames


      Our farm borders the terminal edge of a hundred and fifty thousand acre wetland wildlife preserve named "The Six Mile Cyprus Swamp". We are located at the south western edge where the creeks and ponds of the swamp  empty into the canal system that prevents flooding in our area. This wildlife preserve forms a veritable super highway for wildlife that extends from the edge of the Gulf of Mexico, northeast in towards the center of Florida. If you've ever spent a day traveling on a highway you understand that when you reach the end you only want to get out, stretch your legs and grab a bite to eat. 

      Needles to say my chickens and rabbits are under an abnormal amount of predation.  It is not uncommon to have families of bobcats, panthers, raccoons, river otters, eagles, hawks, etc. strolling around the yard. My first attempts with chickens were more of a quick stop buffet line than any type of egg production.    Over time I increased security until I came up with this thousand square foot walled and roofed area. It has so far been effective at separating the predators from prey.  It is a little stressful at times for the chickens and rabbits when bobcats sit up on the wire roof looking in trying to figure how to get in. 

      This is a photo of the shared rabbit and chicken run. The chicken coop is on the right side. The coop is on top, it has a wire floor that lets the waste fall into the worm bed in the center, which has a wire floor that lets the castings collect in the box on the bottom. The castings are used in my potting mix for nursery plants. To date this is the easiest coop, worm bed, casting bin that I've seen. The rabbits have a hutch on the left side that  is obscured by shrubs. They are all able to come and go as they please, and seem to get along well. 

    The biggest problem that I've had since I've stopped feeding the wildlife is that the chickens absolutely destroyed every living plant within the confines of the wire cage. Within two weeks they had clear cut and bulldozed the entire thing. I tried replanting the sod but they were just too much for it.  It turned into a sad little prison of scratched up roots and heaps of dusty sand, with the inmates walking around from the water bowl to the dry feeder.  I tried growing some fodder biscuits for them but without an automated system it required more time than I had available on an ongoing basis. 


The answer seems to be some four foot square 1x2 frames covered in one inch plastic fencing fabric. These we seeded with wild bird seed and covered with a light coating of shredded tree mulch. Within a week we had a lush carpet of wild grasses coming up between the fencing. The chickens and the rabbits have both been feeding on the results for several hours each day without apparent over grazing. We started with eight frames planted with grasses, our next trials  will be some frames with kale and collards. The dry food feeders are still being eaten out of but not at nearly the rate they were.  This system is saving me feed money, and costing no time to maintain once the sprinkler timer was set. 


    My future plans for this area is to increase the planted area for the livestock, square off a sunny eight foot sq. for a chicken dirt bath and reclaim the rest for some wicking beds that I can plant some root vegetables in.  I think that I can keep the birds out of those beds with a cover of four by four screens kept above the plants. 
        Time will tell.  Mat 


Tuesday, May 7, 2013

A cheap and fast patch for your lettuce raft or media bed


 When I was setting up my lettuce raft recently I wanted to try to use some 6mil poly sheet that I had left over from skinning my greenhouse. I didn't want to spend the money on the 20 mil scrim if I didn't have to. Plus with the end of the roll already in my shop I decided to try it and if it didn't work I could just roll it back up and save it for later. So of course when I started filling the raft up I found a few micro holes where the folds in the plastic were. (Notice the dark spot in the center of the sheet.)


Not one to give up easily, I noted that the 3M 5200 marine caulk that I had been using on my through hull fittings says that it works wet or dry. So I cut out a 4"x6" piece of plastic, put a quarter sized blob of caulk in the center of it, folded it over and squeezed it around until it was evenly spread. Then I just opened up the patch and put it on under the water. That caulk is very sticky, with just a little smoothing out it was down.  The patch looked like it was going to be good, so I completed the fill.  The next morning I could till that they held as the wet spots hadn't spread out on the ground cover fabric that's under the poly. 

The only down side with this material is that the caulk will harden in the tube a few days after it is opened.  It is available at Home Depot, Lowes, and West Marine in  regular caulk tube size and also in small squeeze tubes. 

I use this stuff on all my through hull fittings, tank construction and anywhere I need a strong bond in wet conditions.  Mat Roberts 


Wednesday, April 17, 2013

Swirl Tank

So the two hundred plus or minus koi fish have been rescued from certain death from abandonment at my neighbors pond and are residing comfortably in my talapia tank. Now I've got to put it in gear and get the system plumbed and running to keep their world habitable. Although they have been living in a stagnant, algae filled, slime pool without air for the past year. So I've probably got some time.

An inexpensive swirl tank 
 I started off by moving about four hundred gallons of their water with them to start my thousand gallon tank off with some good bacteria. I'll fix the algae problem later. To build a good swirl tank on the cheap I started with with a Rubbermaid Brute 44 gallon trash can. Into that I put a 1 1/2" thru hull fitting at the bottom of the can for the clean out valve. The swirl tank needs a cone shaped bottom to direct the solid waste down to the clean out. I made my cone from an old dome style trash can lid. I cut off the lid handles that were sticking out then made a cut from the outer edge to the center. This let me pull the two cut edges past each other to make a cone shape. This cone is then put inside the can at the bottom and let to expand out until it fits snug to the sides. It will still be overlapped and cone shaped. I used a sharpie marker to mark the cut edge. Then remove it from the can.

I rebent the lid until the cut edge lines up with the sharpie mark, then run in a couple of 1/2" sheet metal screws thru the lip from the outside towards the inside to hold it in shape. This way the point end of the screw won't poke into the can wall.

I cut and glued up a piece of 1 1/2" pipe and 90 degree fitting and put it in the through hull fitting at the bottom of the can so that the 90 lands in the center. I cut that 90 so that the end that is pointed up is only a quarter inch long. The part that I cut off I used to scribe the center off the cone that I made earlier. This is then cut out with a saber saw so that when the cone is put back in the can it will fit snugly over the PVC 90.

I caulked around the PVC 90 and the outside edge of the cone with 3M 5200 marine caulk. This is a tuff caulk that will hold it in place without screwing through the can wall. I also used it on all the through hull fittings.

On the outside of the can I reduced my clean out down to1" pipe and put a butterfly valve inline. I then put a 1 1/2" through hull fitting through my fish tank a the finished water level height that I want, then lined up that fitting with my swirl tank on the outside.

A matching 1 1/2" through hull fitting was installed into the tank and PVC pipe was press fitted in to connect the fish and swirl tanks. I only press fit these as there is so little head pressure that high up in the tank. It also makes it easier if you have to move it later. This pipe gets a 90 on the inside and a short piece of pipe kicked at an angle to get the swirl going. The last fitting goes in a couple of inches lower than the inflow line and a piece of pipe is stubbed up to establish the tank water level. This is the outflow line that goes back to the sump tank. So now you have an inflow an outflow and a clean out line. The solids come in from the fish tank, swirl around, settle to the bottom, and are cleaned out as needed. The clean water rises to the out flow and exits to the sump.

Tuesday, April 2, 2013

Chicken Tractor

Chickens enjoying bug brunch
Baby chicks exploring their new coop
Chickens are around the most enjoyable creatures that you can have. They require little attention, are inquisitive and personable, and add a lot of character to your aquaponic garden.

Although not directly part of the system, they are an integral part of our overall sustainability effort. We enjoy their company so much that we put a table and chairs out in the yard so we can sit with them in the afternoon.

Fresh eggs 
Maybe have a glass of wine and share some blueberries with them before dinner. Our rabbits share the same common area with them but are not nearly so engaging.

Our chickens split their time between a fenced enclosure, with the rabbits and a chicken tractor. The tractor is a combination mobile coop and secure yard on wheels that allow you to move the chickens to fresh pasture every couple of days. You can really taste the difference in the eggs when the chickens get all those fresh greens and bugs in their diet.

Here are some images of the chicken tractor that I put together for our small flock. It is light weight and strong. It is the same construction technique as the arch frame greenhouse only smaller. Attached to that light weight frame is 1/2" hardware cloth covered with a 6oz white tarp.

Chicken tractor under a shade tree


The tarp covers the top for shade and extends down around one end to the ground the keep the feed dry during rainstorms. I can wheel this one around the yard with one hand. This is not my first attempt at constructing a tractor. My first one was a 2x4 and sheet metal affair that moved more tank like than tractor. It must of weighed 150 lbs While I was building this one I put a black soldier fly compost box in the coop area so that I can load up the kitchen scrapes into it once a week or so and the finished larva drop down the chute into a feed tray. One less thing for me to do. I keep a regular feed dispenser in the coop but they chickens much prefer the fresh greens and bugs. The coop and nest boxes are upstairs with the feed and scratch area down below.

The whole thing weighs about 50 pounds. So not so bad to move around the yard. The wheels are removable, so once it's where you want it they come off and the tractor sits flat on the ground. This helps to keep the predators out. I stapled a small, bunched up, rope of bird netting around the bottom edge to make a 'snake stop' gasket. It's loose enough that it expands into any holes that may be in the ground around the base. When the birds are small like these guys the king and indigo snakes will try and slips for a quick snack. Once they're full size that's not so much of a problem. If this tractor looks like something you may want, we are working on a video on the construction process that will be on our web site www.shamrockaquaponicfarm.com soon.  Mat

Thursday, March 28, 2013

Aquaponics: Our Story

Our venture into aquaponics started when our lush, abundant, first summer garden was, in the course of one week, decimated by cut worms, white flys and all the other crawlers that had descended onto it. I knew that I didn't want to go chemical as a response to that assault, but what else can you do? So we went to the web.

Some of the the videos that I found, on you tube, of aquaponic gardens were simply astounding. Lush, verdant rows of leaf and vine crops growing without pesticides at twice the speed of raised beds seemed impossible. Hundreds of talapia, circling indoor tanks, providing all the nutrients for the plants, while the plants scrubbed the water for the fish just seemed too perfect. Then I realized that this is just the way it works in the bigger environment. Just a smaller, easier to control, version.

The key to this microcosm was the greenhouse. Being able to control the rainfall, temperature, and well, all aspects of the environment would give me the ability to grow an organic, insect free garden. Then the bad news. The greenhouses available on the market were of two varieties, the $100 dollar, rickety, DIY PVC hoop house or the $40,000 Victorian glass atrium. Either I didn't want to own it or I couldn't afford to. I needed something in the middle, and preferably on the lower end of the middle.

Look as I might, I was unable to find anything online that would meet my requirements. Then one evening I was watching a PBS documentary on the cathedrals of Europe and in particular about how the strength of the segmented arch allowed these churches to raise to unachieved heights.

Cathedral of Reims, France.
The next day I started playing around with the shape. I was able to find some information on line as to the the optimal ratio of radius to width, which helped greatly. Once the design on paper looked pretty good I started working on a prototype. I've had enough experience laying up boats and other curved structures ( bookcase from carols studio) that the jig layout was not a big project.

The biggest surprise was just how inexpensive the arches are to construct. Each segment arch for a 24' wide greenhouse is comprised of two 2x4s and half of a 2x6 ripped and glued up on a jig. About twelve bucks each including fasteners. To build a24'x40' I was going to need 22 arches. This would let me build my greenhouse for $500                                             buck or so. This is the neighborhood I was looking for.

Bookcase from Carol's Art Studio 
I took my drawings to a local structural engineer for review. He thought that the design would satisfy the new south Florida 160mph wind code with some modifications. With his input we redrew the plans in four sizes, added some exterior treatment choices, four or five foundation plans and some fastener schedules.

I made the decision to log and post anything ideas or process that I came up with during the development of our aquaponic system that someone else might get some benefit from. This led to our website www.shamrockaquaponicfarm.com. And to the blog that your reading now. It is my goal to keep the information free and any products to its bare minimum price possible. With that said here we are. Keep an eye on this blog and Ill keep writing up any thing that seems worthwhile. Mat
Floor, Side and Front Elevation 24'x40' Greenhouse